An Intro To DaiJS
The MakerDao project created the DAI stable token. A stable token is pegged to some fiat currency, which allows it to be a unit of account. Dai is a decentralized stable coin pegged to the US Dollar value (i.e. 1 Dai = $1).


Build applications on top of MakerDao
Here Alan Greenspan (Chair of the Federal Reserve of the United States - 1987 to 2006) is answering David Gregory in 2011:
David Gregory: “Are U.S. treasury bonds still safe to invest in?”
Alan Greenspan: “Very much so. This is not an issue of credit rating, the United States can pay any debt it has because we can always print money to do that. So, there is zero probability of default.”
Current Central Banking systems have the power to print money out of thin air and solving this issue was at the core of Bitcoin’s creation. Now we have technologies which replicate the same systems, but in a more trust-less manner. For example, MakerDAO.
First: What is MakerDao?
The MakerDao project created the DAI stable token. A stable token is pegged to some fiat currency, which allows it to be a unit of account. Dai is a decentralized stable coin pegged to the US Dollar value (i.e. 1 Dai = $1).
Think of Dai as an electronic dollar; a dollar on the Ethereum blockchain.
Dai token governance depends on MKR token, which makes it a DAO (Decentralized Autonomous Organization), hence MakerDAO. At the time of writing this article, the DAI system is 150% collateralized — meaning to get 100 DAI you need at least $150 worth of Ether (ETH).
What is CDP?
A Collateralized Debt Position (CDP) is the only way to create DAI. According to MakerDao white paper:
Anyone who has collateral assets can leverage them to generate Dai on the Maker Platform through Maker’s unique smart contracts known as Collateralized Debt Positions. A Collateral Asset is a digital asset that the decentralized Maker Governance process has input into the system.
In simple words, a CDP is a loan taken against a digital asset (such as Ether/ETH). When you open a CDP, the system will generate Dai.
CDP using Dai JS
Now let's play with Dai JS and create CDP using it. Before that, we need to perform a few steps:
Generate address on Koven network
To play with the dai.js let's create a brand new address on Koven network. We are going to use NodeJs, so install that first in case you don’t have that.
mkdir wallet
cd wallet
npm i ethereumjs-wallet
Now create a file app.js in the same wallet directory and paste below code.
const Wallet = require('ethereumjs-wallet');
const wallet = Wallet.generate();
console.log("privateKey: " , wallet.getPrivateKeyString());
console.log("address: " , wallet.getAddressString());
Now open the terminal and run node app.js , That’s it, you have made an Ethereum private key with a public address.
Import address to Metamask
Next, we will import this address to Metamask so things become easy (You will see this later).
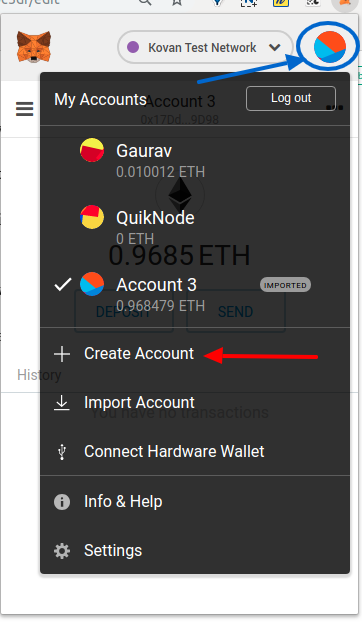
To import address follow these steps-
- Click on Metamask and select Koven network
- Then click on the top right circle and click on Create Account option
- Then click on import and paste your Private keys (generated above)
Now let get some test ETH from Kovan Faucet using this site.
Dai JS
Current MakerDao enables you to do the following:
- Opening and closing CDPs
- Locking and unlocking collateral
- Withdrawing and repaying Dai
- Automated token conversions
- Token contract functionality for WETH, PETH, MKR, Dai, and ETH
- Buying and selling MKR and Dai with built-in DEX integration
MakerDao already created a GitHub repo, with different examples, which we forked. So let’s import the repo using below commands:
cd && git clone https://github.com/buddies2705/integration-examplesThis Repo has the following type of examples:
- CDP creation and fulfillment
- Hardware wallet integration examples such as Ledger and Tezos
- Leverage (Similar to margin trading, Create CDP-> Get DAI -> Buy ETH on the exchange using DAI -> Repeat )
- Top up your CDP
- Using Wyre to covert DAI into fiat
- A full example on how to create and close CDP
In this tutorial, we will look into the creating and closing CDP example, but before that let’s run our application and see things in practice.
First, let’s add our private key in our code:
cd integration-examples/react-example
cp .env.example .env
Then add private keys in the .env file. We need a web3 provider to interact with Ethereum blockchain, so get your Web3 URL ready (we’re going to use QuickNode ← you sign up here):
npm install
npm start
This will open a window on the browser. Make sure you have selected the correct Metamask account (account we recently added) and Kovan network above. Next open browser console using F12 and click on the start button. Now, wait you will see the following steps getting completed.
- Maker created
- CDP opened
- Eth Locked
- Dai Drawn
- Debt Wiped
- CDP Shut
You can see more output logs in the browser console.

Behind the Scene
Now lets deep dive into the code and see what’s happening. Open index.js in action folder.
import Maker from '@makerdao/dai';
const infuraProjectId = 'c3f0f26a4c1742e0949d8eedfc47be67'; //dai.js project id

export const started = () => ({
  type: 'STARTED'
});

export const makerCreated = () => ({
  type: 'MAKER_CREATED'
});

export const cdpOpened = () => ({
  type: 'CDP_OPENED'
});

export const ethLocked = () => ({
  type: 'ETH_LOCKED'
});

export const daiDrawn = () => ({
  type: 'DAI_DRAWN'
});

export const daiWiped = () => ({
  type: 'DAI_WIPED'
});

export const cdpShut = () => ({
  type: 'CDP_SHUT'
});

const drawDaiAsync = (maker, cdp) => async dispatch => {
  const defaultAccount = maker
    .service('token')
    .get('web3')
    .defaultAccount();
  const dai = maker.service('token').getToken('DAI');
  const txn = await cdp.drawDai(0.1);
  const balance = await dai.balanceOf(defaultAccount);
  console.log('Transaction from drawing Dai:', txn);
  console.log('Dai balance after drawing:', balance.toString());
  dispatch(daiDrawn());
};

const wipeDebtAsync = (maker, cdp) => async dispatch => {
  const defaultAccount = maker
    .service('token')
    .get('web3')
    .defaultAccount();
  const dai = maker.service('token').getToken('DAI');
  const txn = await cdp.wipeDai(0.1);
  const balance = await dai.balanceOf(defaultAccount);

  console.log('Transaction from wiping Dai:', txn);
  console.log('Dai balance after wiping:', balance.toString());
  dispatch(daiWiped());
};

const shutCdpAsync = cdp => async dispatch => {
  const txn = await cdp.shut();
  console.log('Transaction from shutting the CDP:', txn);
  dispatch(cdpShut());
};

export const startAsync = () => async dispatch => {
  dispatch(started());
  const maker = Maker.create(process.env.REACT_APP_NETWORK, {
    privateKey: process.env.REACT_APP_PRIVATE_KEY,
    overrideMetamask: true,
    provider: {
      infuraProjectId
    }
  });
  console.log('maker:', maker);
  dispatch(makerCreated());
  const cdp = await maker.openCdp();
  console.log('cdp:', cdp);
  dispatch(cdpOpened());
  const lockEthTx = await cdp.lockEth(0.01);
  console.log('transaction to lock eth:', lockEthTx);
  dispatch(ethLocked());
  await dispatch(drawDaiAsync(maker, cdp));
  await dispatch(wipeDebtAsync(maker, cdp));
  await dispatch(shutCdpAsync(cdp));
};
This is the main file where all the action is happening. You can see it’s creating a Maker instance using our provided private key and network. Next, we are doing the following steps:
maker.openCdp()— Get a CDP instancecdp.lockEth(0.01)— Locking 0.01 CDPdrawDaiAsync(maker, cdp)— Getting Dai for our locked Ether.
const drawDaiAsync = (maker, cdp) => async dispatch => {

//Getting default account
const defaultAccount = maker.service('token')
                            .get('web3').defaultAccount();

//Getting token
const dai = maker.service('token').getToken('DAI');

//Drawing CDP
const txn = await cdp.drawDai(0.1);

//checking Dai balance
const balance = await dai.balanceOf(defaultAccount);
console.log('Transaction from drawing Dai:', txn);
console.log('Dai balance after drawing:', balance.toString());
dispatch(daiDrawn());
};
Here we have our DAI in our address. You can comment out the last 2 lines in case you don’t want to close this CPD and check your balance here. Make sure that you have selected the Kovan network and correct account in Metamask.
dispatch(started());
  const maker = Maker.create(process.env.REACT_APP_NETWORK, {
    privateKey: process.env.REACT_APP_PRIVATE_KEY,
    overrideMetamask: true,
    provider: {
      infuraProjectId
    }
  });
  console.log('maker:', maker);
  dispatch(makerCreated());
  const cdp = await maker.openCdp();
  console.log('cdp:', cdp);
  dispatch(cdpOpened());
  const lockEthTx = await cdp.lockEth(0.01);
  console.log('transaction to lock eth:', lockEthTx);
  dispatch(ethLocked());
  await dispatch(drawDaiAsync(maker, cdp));
  await dispatch(wipeDebtAsync(maker, cdp));
  await dispatch(shutCdpAsync(cdp));
Next, you can see we are wiping out our debt using the last two lines.
await dispatch(wipeDebtAsync(maker, cdp))— This will wipe Dai in our wallet. When you close a CDP, those Dai tokens get burned.await dispatch(shutCdpAsync(cdp))— Next, we can shut down our CDP.
That’s it! You have successfully created a CDP and closed it.
A lot of things happened under the hood. Let’s understand them.
What happens when you create DAI?
- ETH get converted into WETH (Wrapped ETH). WETH is an ERC20 token in which 1ETH = 1WETH, and you can exchange them whenever you want.
- WETH gets converted into PETH (Pooled ETH), meaning it joins a large pool of ETH that is the collateral for all Dai created. This PETH actually gets locked in a smart contract which gets used to generate the CDP.
- Also, when you close a CDP, you need to pay a 1% annual fee in MKR token (Maker token) and a pre-decided stability fee in PETH (which is 11.5% now) against the loan value.
You can check your balances here.
Wrapping Up
So, in this article, we saw how to use Dai JS and play with CDP. There are a lot of things you can do using DaiJS, check developer docs here. Dai also has a DAI CLI which can be used to play with CDP.
If a step wasn’t clear and you’d like us to go into greater detail, or you want to see more tutorials on Dai JS, let us know in comments!
Open Finance Movement (#DeFi)
Dai opens a lot of functionality. It is pegged to the US Dollar and programmable. With multi-collateral Maker, there will be many assets compatible with the MakerDao project. One can digitalize their GOLD or real estate and receive DAI. Globally, 1.7 billion adults remain unbanked, yet two-thirds of them own a mobile phone. You can imagine what Crypto can bring to those unbanked.
“Banking the Unbanked”
Need help with your project or have questions? Contact us via this form, on Twitter @QuickNode, or ping us on Discord!
About QuickNode
QuickNode is building infrastructure to support the future of Web3. Since 2017, we’ve worked with hundreds of developers and companies, helping scale dApps and providing high-performance access to 16+ blockchains. Subscribe to our newsletter for more content like this and stay in the loop with what’s happening in Web3! 😃