Creating Ethereum Smart Contracts via Command Line
This week we are going to create a Smart Contract using sbt-ethereum! sbt-ethereum not only allows you to create Smart Contracts, but also helps you manage your web3 projects (like one would with Truffle), though sbt’s rich command line tool. (it just makes your life easier as a web3 developer!)


An interactive command line alternative for your favorite Smart Contract development tool (like Truffle!)
In last week’s article, we talked about how to interact with an already-deployed Smart Contract using sbt-ethereum. This week we are going to create a Smart Contract using sbt-ethereum!
sbt-ethereum not only allows you to create Smart Contracts, but also helps you manage your web3 projects (like one would with Truffle), though sbt’s rich command line tool. (it just makes your life easier as a web3 developer!)
If you just stumbled upon this article, we strongly recommend you check the previous part of this series.
Part 1- sbt-ethereum — A Tool for Interacting with the Ethereum Blockchain via Command Line
Part 2- Interact with Smart Contracts using the Command Line
Before diving in, we need to install a few things (if you don’t have them already):
- Install Java (version ≥ 8 )
- Install Git
- Install Maven (Maven is dependency management for Java ecosystem; what is npm in nodejs, maven is for Java ecosystem)
Once installed we are ready to dive in 👉
In previous tutorials, we’ve run sbt by executing the ./sbtw wrapper script within the eth-command-line repository. This time, we need to create our own repository.
To get sbt-ethereum project’s template, we will use giter8. Giter8 is a command line tool to generate files and directories from templates published on Github or any other git repository. Giter8 helps us by scaffolding projects based on a pre-defined template.
Use this command to create a project repository:
sbt new swaldman/solidity-seed.g8As sbt-ethereum is an interactive build tool, this command will ask a few questions:
[info] Loading project definition from /Users/testuser/project
[info] Set current project to testuser (in build file:/Users/testuser/)

A minimal solidity project for sbt-ethereum

name [my-solidity-project]: eth-timelock
version [0.0.1-SNAPSHOT]:
sbt_ethereum_version [0.1.7-SNAPSHOT]:
sbt_version [1.2.8]:

Template applied in ./eth-timelock
This will create a new eth-timelock directory (see above, we have given eth-timelock as a project name). This is how the directory structure looks like:
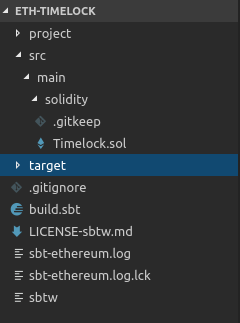
Now we are ready to create our first contract. Remember, create all contracts under src/main/solidity .
We are going to create Timelock contract. It accepts payment of ETH when the contract is created, and only allows that ETH to be withdrawn by the creator of the contract after a specified delay.
Create a Timelock.sol file under src/main/solidity
Timelock.sol
pragma solidity >=0.4.24;

contract Timelock {
  address public owner;
  uint public releaseDate;

  constructor( uint _days, uint _seconds ) public payable {
    require( msg.value > 0, "There's no point in creating an empty Timelock!" );
    owner = msg.sender;
    releaseDate = now + (_days * 1 days) + (_seconds * 1 seconds);
  }

  function withdraw() public {
    require( msg.sender == owner, "Only the owner can withdraw!" );
    require( now > releaseDate, "Cannot withdraw prior to release date!" );
    msg.sender.transfer( address(this).balance );
  }
}
Now let's compile our project.
First, run sbt inside your eth-timelock directory:
$ sbt
[info] Loading settings for project eth-timelock from build.sbt ...
[info] Set current project to eth-timelock (in build file:/Users/testuser/eth-timelock/)
[info] Updating available solidity compiler set.
[info] sbt-ethereum-0.1.7-SNAPSHOT successfully initialized (built Sun, 17 Feb 2019 21:58:11 -0800)
Next run compile :
sbt:eth-timelock> compile
[info] Compiling 1 Solidity source to /Users/testuser/eth-timelock/target/ethereum/solidity...
[info] Compiling 'Timelock.sol'. (Debug source: '/Users/testuser/eth-timelock/target/ethereum/solidity/Timelock.sol')
[info] No Scala stubs will be generated as the setting 'ethcfgScalaStubsPackage' has not ben set.
[info] If you'd like Scala stubs to be generated, please define 'ethcfgScalaStubsPackage'.
[info] Updating ...
[info] Done updating.
[success] Total time: 1 s, completed Feb 25, 2019 12:16:01 AM
If you see any warning, just ignore it. You can see ABI get created under /target/ethereum/solidity .
Now we are ready to deploy our Smart Contract. But before that, if you want to switch the network, you can like this:
First, check your network with ethNodeChainIdPrint . sbt-etherum has MainNet set by default. Let’s change it to Ropsten (if you want some other testnet, feel free to do so too).
ethNodeChainIdOverrideSet 3Here, 3 is the Ropsten network id. Remember, you should have a bit of ETH in your account to deploy the contract.
Now let’s start deploying:
sbt:eth-timelock> ethTransactionDeploy Timelock <TAB>Always use Tab, sbt-ethereum has very rich Tab support for command completion. When you press Tab, it will tell you what to do next.
Our Smart Contract will need two parameters:
days — The number of days when the owner will be able to withdraw Ether.
seconds — Number of seconds when the owner will be able to withdraw Ether.
We’ll need the Smart Contract’s compute time using days + seconds, so let’s pass 0 days and 300 seconds (5 minutes):
ethTransactionDeploy Timelock 0 300 <TAB>Now we need to pass the Ether amount, which will lock the contract for the given time. You can pass ETH amount using wei, gwei, szabo, finney, or ether units.
Let’s lock 10 wei for 5 minutes (300 seconds):
ethTransactionDeploy Timelock 0 300 10 weiThis will ask you to unlock your wallet using your passphrase and then ask you to submit the transaction. It will also ask to provide an alias name for your deployed contract.
Once done, it will give you deployed contract address which you can see on Etherscan. Let check the balance of the contract using:
ethAddressBalance timelockHere timelock is alias name which we used while deploying our contract.
Interacting with your Smart Contract
Now, before 5 minutes runs out, let’s mock-test our Smart Contract using ethTransactionMock. This simulates a transaction on our Ethereum Node, but does not actually execute the transaction. So let’s try that:
sbt:eth-timelock> ethTransactionMock timelock withdrawIf you execute this within 5 minutes of deploying the Smart Contract, you will see an error. Execute the above command after 5 minutes and you will see a success message, but it does not run the command actually.
Now let’s actually withdraw our 10 wei from the contract after 5 minutes using:
ethTransactionInvoke timelock withdrawThis will create a transaction and withdraw the locked 10 wei. Once this command succeeds, you can check the balance of the contract again:
ethAddressBalance timelockConclusion
That’s it for today! Now you have another way to #buidl and deploy Smart Contracts. Let us know if you liked the article in the comment section and if you want to see more on this (or similar) topic 🙏
Need help with your project or have questions? Contact us via this form, on Twitter @QuickNode, or ping us on Discord!
About QuickNode
QuickNode is building infrastructure to support the future of Web3. Since 2017, we’ve worked with hundreds of developers and companies, helping scale dApps and providing high-performance access to 16+ blockchains. Subscribe to our newsletter for more content like this and stay in the loop with what’s happening in Web3! 😃