Ethereum for Java Developers
Enterprises all over the world use Java to build scalable systems which we use in our daily lives. Today, we will talk about Web3j – a library written in Java for Ethereum developers!

Enterprises all over the world use Java to build scalable systems which we use in our daily lives. Today, we will talk about Web3j – a library written in Java for Ethereum developers!
What is Web3j?
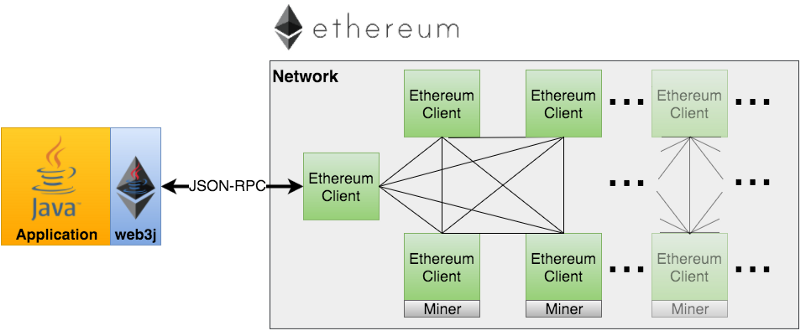
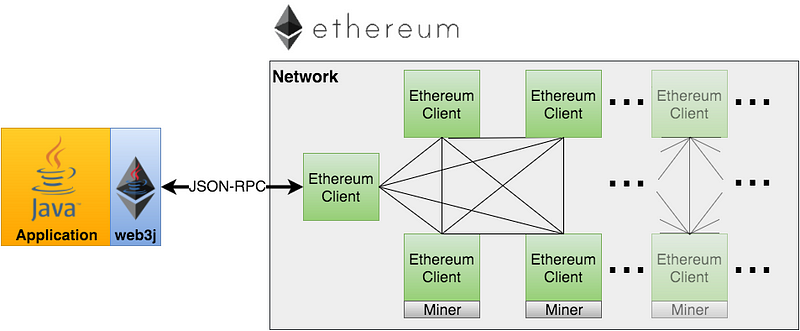
Web3j Java library to expose Ethereum JSON RPC APIs. You can use it for building web, mobile, or any other type of applications. The web3j documentation describes:
web3j is a highly modular, reactive, type safe Java and Android library for working with Smart Contracts and integrating with clients (nodes) on the Ethereum network:
What does Web3j support?
Web3j has rich support of Ethereum JSON-RPC:
- Complete implementation of Ethereum’s JSON-RPC client API over HTTP and IPC
- Ethereum wallet support
- Auto-generation of Java smart contract wrappers to create, deploy, transact with and call smart contracts from native Java code (Solidity and Truffle definition formats supported)
- Reactive-functional API for working with filters
- Ethereum Name Service (ENS) support
- Support for Parity’s Personal, and Geth’s Personal client APIs
- Support for ERC20 and ERC721 token standards
- Comprehensive integration tests demonstrating a number of the above scenarios
- Command-line tools
- Android compatible
- Support for JP Morgan’s Quorum via web3j-quorum
Additionally, it also provides ENS and Wallet support 😎.
Moreover, it supports Quorum: a blockchain framework created by JPMorgan (Chase, the bank!).
Web3j Examples
Let's set up a project and deep-dive into the code. We will see some basic Ethereum use-cases and how we can use Web3j to build Ethereum applications in Java.
Prerequisite
- Java ≥ version 8
- Maven
- Any Java IDE (I am using IntelliJ Community version)
- Solc (Solidity compiler)
- A QuickNode (QuickNode.com)
- Web3j command-line tools
Note: we're using Ubuntu bionic (18.04)
Install Solc compiler
We need to install the Solidity compiler... we will use it to compile our Smart Contact later. Check here for a detailed installation guide.
sudo add-apt-repository ppa:ethereum/ethereum
sudo apt-get update
sudo apt-get install solc
Setting up the project
Let’s create a new project and import Web3j dependency using Maven.
<!-- https://mvnrepository.com/artifact/org.web3j/core -->
<dependency>
   <groupId>org.web3j</groupId>
   <artifactId>core</artifactId>
   <version>4.5.5</version>
</dependency>
Connecting to Ethereum Blockchain using Web3j
Let's begin to play!
First, we will connect to the Ethereum blockchain using QuickNode and Web3j.
Note: If you have any problems following the tutorial, we've attached the GitHub repo at the end.
Web3j web3 = Web3j.build(new HttpService("YOUR_QUICKNODE_URL"));

Web3ClientVersion web3ClientVersion = web3.web3ClientVersion().send();

String clientVersion = web3ClientVersion.getWeb3ClientVersion();System.out.println("Client version" + clientVersion);
Here we are simply connecting to Ethereum blockchain using QuickNode and printing our Ethereum client version.
Creating an Ethereum Wallet
Let’s create an Ethereum wallet now using Web3j. Web3j provides full wallet management functionality. We will use WalletUtils for this purpose.
Here we are specifying our wallet password and the path where wallet file will be stored. I have added my own password and directory according to my system.
String walletPassword = "trumpshouldbeimpeached";
String walletDirectory = "/home/batman/wallet/"; //add your own wallet directory path

String walletName = WalletUtils.generateNewWalletFile(walletPassword, new File(walletDirectory));System.out.println(walletName);
Load Ethereum Wallet
Now let’s see how we can load our wallet we just created and get a new address from it.
Credentials credentials = WalletUtils.loadCredentials(walletPassword, walletDirectory + "/" + walletName);

String accountAddress = credentials.getAddress();System.out.println("Account address: " + accountAddress);
Subscribing for Ethereum Events
Events are important part of Ethereum blockchain and serve as a logging mechanism for Ethereum blockchain State changes.
Subscribing for New Blocks
Every few seconds (13, on average), a new Ethereum blocks get mined. Let’s subscribe to that:
Subscription subscription = (Subscription) web3.blockFlowable(false).subscribe(block -> { System.out.println(block.getBlock().getHash());});
Subscribing for New Transactions
Blocks contain transactions; we can subscribe to them too:
Subscription subscription = (Subscription) web3.transactionFlowable().subscribe(tx -> { System.out.println(tx.getHash());});Subscribing for Pending Transactions
Every time a transaction gets created, it first goes into the mempool. From the mempool, miners pick up transactions to mine. Until a miner picks up a transaction, it’s remains in pending status. Let’s subscribe to pending transactions now.
Subscription subscription = (Subscription)web3.pendingTransactionFlowable().subscribe(tx -> { System.out.println(tx.getHash());});Subscribing to Smart Contract Events
Ethereum allows Smart Contracts. Subscribing to Smart Contract events is a very important use-case while building dApps (decentralized applications) on Ethereum.
The SimpleBank.sol Smart Contract
We have created a SimpleBank Smart Contract which emits a Deposit event when someone deposits in our Bank.
pragma solidity ^0.5.8;

contract SimpleBank {
    uint8 private clientCount;
    mapping (address => uint) private balances;
    address public owner;

    event LogDepositMade(address indexed accountAddress, uint amount);

    constructor() public payable {
        owner = msg.sender;
        clientCount = 0;
    }


    function enroll() public returns (uint) {
        if (clientCount < 3) {
            clientCount++;
            balances[msg.sender] = 10 ether;
        }
        return balances[msg.sender];
    }


    function deposit() public payable returns (uint) {
        balances[msg.sender] += msg.value;
        emit LogDepositMade(msg.sender, msg.value);
        return balances[msg.sender];
    }


    function withdraw(uint withdrawAmount) public returns (uint remainingBal) {
        // Check enough balance available, otherwise just return balance
        if (withdrawAmount <= balances[msg.sender]) {
            balances[msg.sender] -= withdrawAmount;
            msg.sender.transfer(withdrawAmount);
        }
        return balances[msg.sender];
    }


    function balance() public view returns (uint) {
        return balances[msg.sender];
    }

    function depositsBalance() public view returns (uint) {
        return address(this).balance;
    }
}
You can deploy this contract using Web3j, which we will see in our next tutorial.
For now, we will deploy our contract using Remix (an online Solidity IDE).
After deployment, save your contract's address somewhere (we will need later in the tutorial).
Now we need to compile our SimpleBank Smart Contract.
For this, we will use solc compiler.
Here replace <contract>.sol with our SimpleBank.sol, and also provide an output directory:
$ solc <contract>.sol --bin --abi --optimize -o <output-dir>/Web3j provides a command-line tool to generate a Java Wrapper class for your Solidity Smart Contract. To install the Web3j command-line tool check here.
Now we're ready to generate our Smart Contract wrapper class using the below command:
web3j solidity generate -b /path/to/<smart-contract>.bin -a /path/to/<smart-contract>.abi -o /path/to/src/main/java -p com.your.organisation.nameAfter replacing arguments, in my case this command was:
web3j solidity generate -b SimpleBank/SimpleBank.bin -a SimpleBank/SimpleBank.abi -o ~/IdeaProjects/quicknode/src/main/java/ -p com.simplebankThis will generate a Java class SimpleBank on our given path.
Getting an Instance of Smart Contract
Now let’s get an instance of our smart contract so we can interact with it.
SimpleBank simpleBank = SimpleBank.load("0x7208b4883a4dF0F3e5cD084F2F9C579e7b622A38",web3, credentials , new DefaultGasProvider());Note: Here 0x7208b4883a4dF0F3e5cD084F2F9C579e7b622A38 is our Smart Contract address, deployed on the Ethereum blockchain.
Now we can listen to Deposit event from our Web3j.
simpleBank.logDepositMadeEventFlowable(DefaultBlockParameterName.EARLIEST,DefaultBlockParameterName.LATEST).doOnError(error -> System.err.println("The error message is: " + error.getMessage())) .subscribe(logDepositMadeEventResponse -> System.out.println(logDepositMadeEventResponse.amount));SimpleBank class creates a logDepositMadeEventFlowable method that we can use to subscribe to Deposit events.
Once we have the event, we are printing the deposit amount, which emits with the deposit event.
In the next tutorial, we will deep-dive into transactions with Web3j and calling SimpleBank contract methods.
Full Code — Here is the complete code on Github.
Need help with your project or have questions? Contact us via this form, on Twitter @QuickNode, or ping us on Discord!
About QuickNode
QuickNode is building infrastructure to support the future of Web3. Since 2017, we’ve worked with hundreds of developers and companies, helping scale dApps and providing high-performance access to 16+ blockchains. Subscribe to our newsletter for more content like this and stay in the loop with what’s happening in Web3! 😃