DSA-SDK - DeFi Development Simplified
Building, integrating and working among different DeFi protocols is still a headache for many developers. DSA-SDK simplifies cross-protocol interactions using smart-contracts and Spells. In this guide we will swap ETH to DAI using Kyber Protocol and DSA Spells.

DeFi is built for compatibility, meaning protocols and apps integrate with each other seamlessly to provide new financial infrastructure.
Currently, more than $1 billion is locked in DeFi, and developers are creating new DeFi apps and protocols every day.
However, building and integrating DeFi protocols, and working among them is still a headache for many developers. This is a big problem for the user experience, one of the roadblocks for mainstream DeFi adoption.
In the previous article, we introduced you to DeFi-SDK, which developers can use to read data across different DeFi protocols.
In this article, we will introduce you to DSA (DeFi Smart Accounts) and how developers can leverage the SDK to build user-friendly DeFi applications.
What is DeFi Smart Accounts (DSA)?
DeFi Smart Accounts (introduced by InstaDapp) enable users & developers to access/integrate all the DeFi protocols using one account. This provides a better user-experience and helps developers build new innovative financial applications.
What problem do DeFi Smart Accounts solve?
There are multiple DeFi protocols for lending, trading, exchange, etc... These are open protocols and developers can integrate them with each other to provide enhanced functionality.
Example- Compound is providing a better yield than MakerDAO, so a developer can help the users switch from MakerDAO to Compound.
Here are what the steps look like.
- Instapool: Access liquidity
- Maker: Payback DAI
- Maker: Withdraw ETH
- Compound: deposit ETH
- Compound: borrow DAI
- Instapool: Return liquidity
To do this a developer needs to understand and integrate with all these systems.
DSA-SDK solves this problem by providing a simple library (back by the smart contract, openly accessible) to perform actions among these DeFi protocols.
DSA-SDK
The DSA-SDK allows developers to interact with DSA accounts and build new applications using it.
DSA-SDK is a JavaScript library which interacts with DSA smart contract and other smart contract connectors (created by InstaDapp) to interact with DeFi protocols.
DSA Architecture
DSAs are created by regular Ethereum accounts (or EOAs). Each EOA can create multiple DeFi accounts. DeFi accounts are fully trustless, so users can choose to withdraw their assets at anytime.
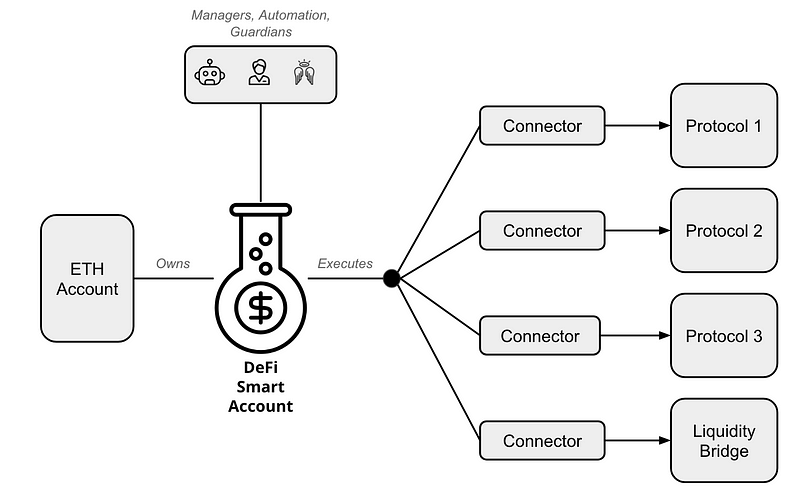
There are 3 key parts in DSAs:
- DeFi Accounts, to store assets and owned by users. DSAs can execute composed transactions across connectors.
- Connectors, which interact with different protocols, allowing developers to perform various interactions.
- Authentication Modules, which users can use set guardians, managers, or third party applications to manage DSAs. Permissions can be modular down to Connector levels. For example, users can allow the wallet provider to rebalance their assets to minimize interest payment or maximize yields, but nothing else.
You can read more about the DSA-SDK architecture on Github.
Interacting with DSA-SDK
Let’s create a DSA account and interact with it using DSA-SDK. Because the library is in JavaScript, it works directly in your console.
Pre-requisite
- Metamask
- ETH balance in your Metamask account
NOTE: DeFi-SDK currently only works in Ethereum Mainnet. We will use real 💰.
Using DSA-SDK, we will swap ETH with DAI through the Kyber protocol.
Now, Open Google Chome console, using CTRL + SHIFT + I on this page and copy-paste the following code.
var script = document.createElement('script');
script.type = 'text/javascript';
script.src ='https://cdn.jsdelivr.net/npm/dsa-sdk@latest/build/dsa.min.js';
document.head.appendChild(script);

var script = document.createElement('script');
script.type = 'text/javascript';
script.src='https://cdn.jsdelivr.net/gh/ethereum/web3.js@1.2.6/dist/web3.min.js'
document.head.appendChild(script);
This will import DSA-SDK in your browser.
Now, let’s see if it’s working:
var dsa = new DSA()dsa.tokens.info.dai.name
It will output DAI Stable.
Now let’s get Etheruem provider (Metamask):
web3 = new Web3(web3.currentProvider);
window.web3 = new Web3(ethereum);
await ethereum.enable();
Now, let’s reinitialize DSA with our web3 provider:
dsa = new DSA(web3);Next, we will create a DSA account. For that run the following command, this will pop up Metamask and ask to approve a transaction. ETH amount should be 0 and you only need to pay the Gas fee.
await dsa.build()
Once you run this command, it will output a transaction hash, which you can use to track on an Etheruem explorer like Etherscan.
Now, we have created our DeFi Smart account. Let’s check it by running the following command:
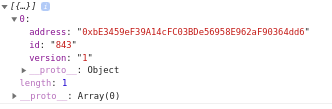
await dsa.getAccounts(ethereum.selectedAddress)
It will output your DSA account address, like below:
Now you need to fund this address. We will swap .01 ETH with DAI, therefore you should fund it with more than 0.01 ETH.
You can send funds directly to your DSA account using Metamask or any other wallet.
Once funds have arrived, we are ready to swap our ETH with DAI using Kyber protocol. If you don’t know, Kyber is an on-chain liquidity protocol using which you can also swap tokens. For this, we will use a Spell.
What are DSA Spells?
Spells are a sequence of connector functions to perform particular actions. These spells can as simple as “lending your ETH on Compound”, or complex like Flash loans.
There are some pre-built spells provided by DSA-SDK, but we can also create our own spells.
For our tutorial, we will cast a Kyber swap spell to covert our ETH into DAI.
Kyber Spell
The following code shows the Kyber spell.
spells.add({ connector: "kyber", method: "sell", args: [buyAddr, sellAddr, sellAmt, unitAmt, getId, setId]});The argument mentioned are:
buyAddr— Address of Token which we want to buy. It’s DAI in our case.sellAddr— Address of Token which we want to sell. It’s ETH in our case.sellAmt— The amount we want to convert, which is 0.01 ETH in our case.unitAmt— The amount of buyAmt/sellAmt with slippage. We need to call a DSA-SDK resolver for this.getId— ID stores the amount of token deposited, we will pass 0 for this.setId— ID stores the amount of token deposited. we will pass 0 for this.
To get unitAmt, we need to use DSA-SDK to call the Kyber swap contract.
dsa.kyber.getBuyAmount(buyToken, sellToken, sellAmt, slippage);
Here the fields are.
buyToken— Token contract address you want to buy. In our case, it’s DAI.sellToken— Token contract address you want to sell. In our case, it’s ETH.sellAmt— 0.01 ETHslippage— how much slippage, we allow while swapping. In our case, it’s 1%.
Now run the following function in your console to get the unitAmt.
await dsa.kyber.getBuyAmount(dsa.tokens.info.dai.address, '0xeeeeeeeeeeeeeeeeeeeeeeeeeeeeeeeeeeeeeeee', '0.01', 1);It will give us the below result.

Now, we have the unitAmt , we will prepare our spell.
let spells = dsa.Spell();

var buyAddr = dsa.tokens.info.dai.address
var sellAddr= '0xeeeeeeeeeeeeeeeeeeeeeeeeeeeeeeeeeeeeeeee'
var sellAmt = dsa.tokens.fromDecimal('0.01', 'eth')
var unitAmt = "238903446303943680897"
var getId = 0
var setId = 0

spells.add({  connector: "kyber",  method: "sell",  args: [buyAddr, sellAddr, sellAmt, unitAmt, getId, setId]});
Now it’s time to cast our spell.
dsa.cast(spells)It will return a transaction hash and now we can check our DSA balance using the following code.
dsaAccountAddress = await dsa.getAccounts(ethereum.selectedAddress)await dsa.balances.getBalances(dsaAccountAddress[0].address)It will show the balances of all supported token in our DSA account.
That’s it! We have used DSA-SDK to use the Kyber protocol to swap our ETH with DAI. You don’t need to learn or integrate with Kyber protocol, DSA-SDK did all the magic 💫
To learn more about DSA-SDK check out the documentation. If you are stuck anywhere, you can reach out to InstaDapp developer telegram.
Need help with your project or have questions? Contact us via this form, on Twitter @QuickNode, or ping us on Discord!
About QuickNode
QuickNode is building infrastructure to support the future of Web3. Since 2017, we’ve worked with hundreds of developers and companies, helping scale dApps and providing high-performance access to 16+ blockchains. Subscribe to our newsletter for more content like this and stay in the loop with what’s happening in Web3! 😃