Ethereum Events monitoring using Eventeum
Event tracking on Ethereum can be very painful when you are building a Scalable Dapp. Today we are going to look at Eventeum, developed by Kauri Team.


Smart contract monitoring made simple and scalable
Event tracking on Ethereum can be very painful when you are building a Scalable Dapp. Today we are going to look at Eventeum, developed by Kauri Team.
What is Eventeum?
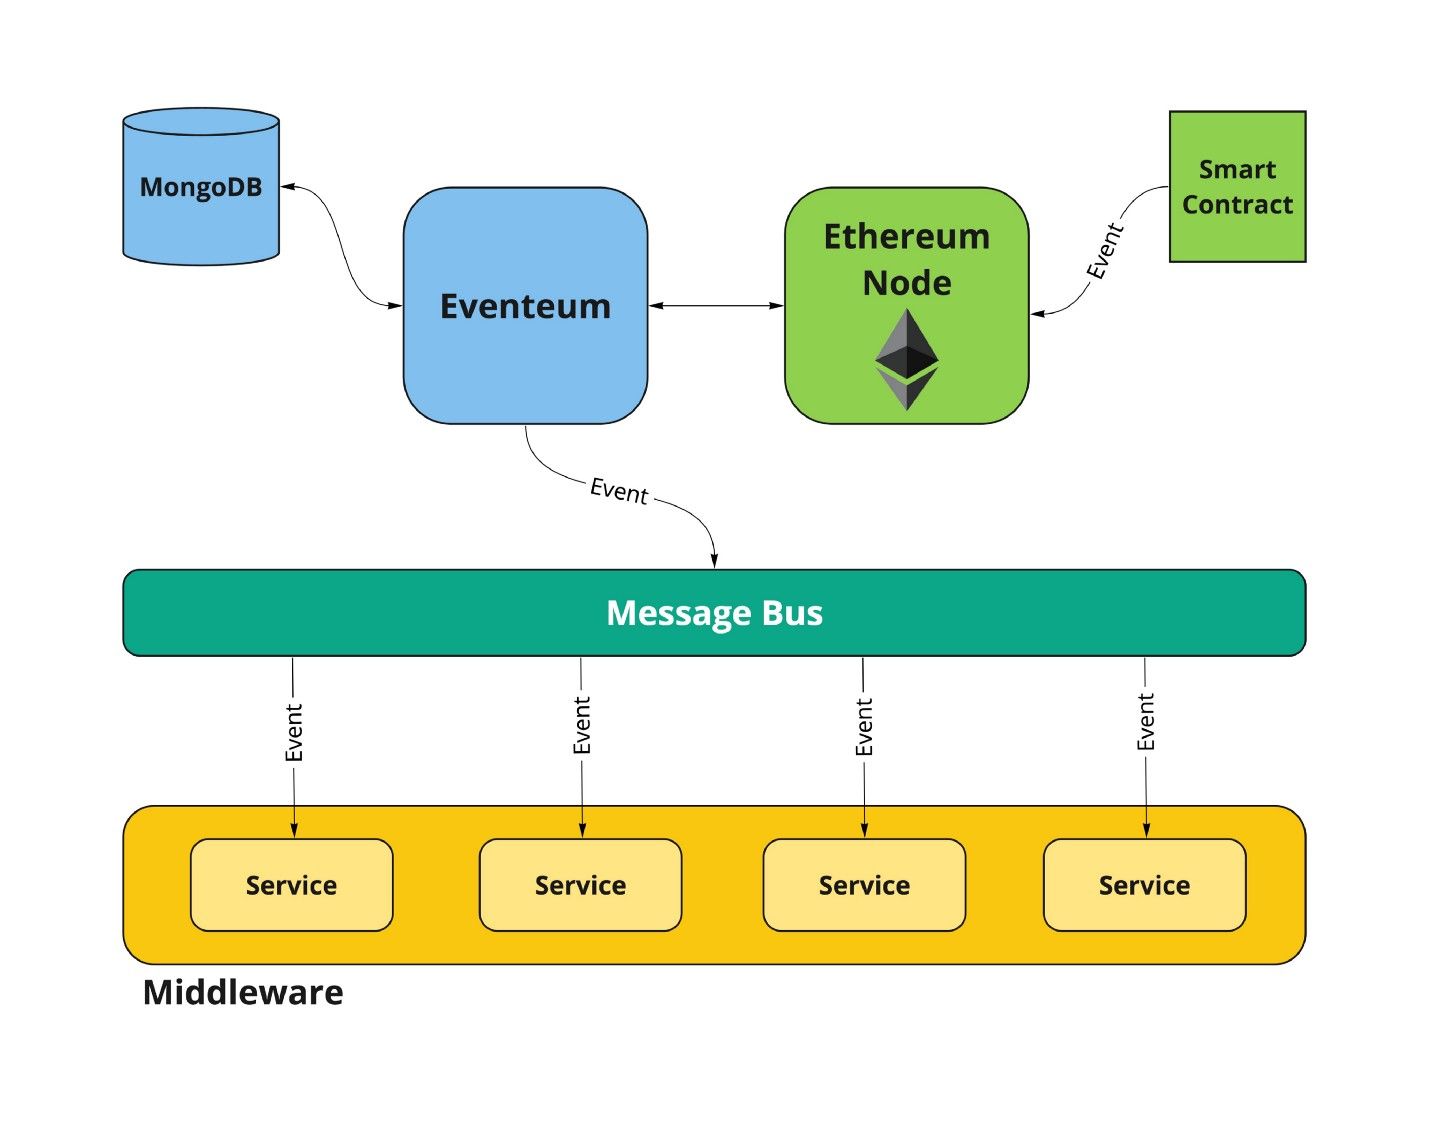
Eventeum is an Ethereum event listener service that provides a bridge between your smart contracts and middleware layer. Events subscriptions can be registered dynamically, and on emission, a message containing the details of the events are broadcast onto a message bus (currently either Kafka or RabbitMQ) which can then be consumed by your backend services.
Eventeum is:
- Dynamically Configurable — Eventeum exposes a REST api so that smart contract events can be dynamically subscribed / unsubscribed.
- Highly Available — Eventeum instances communicate with each other to ensure that every instance is subscribed to the same collection of smart contract events.
- Resilient — Node failures are detected and event subscriptions will continue from the failure block once the node comes back online.
- Fork Tolerance — Eventeum can be configured to wait a certain amount of blocks before an event is considered ‘Confirmed’. If a fork occurs during this time, a message is broadcast to the network, allowing your services to react to the forked/removed event.[source]
Deploying Eventeum
Eventeum supports 3 broadcast mechanisms.
- Kafka
- HTTP Post
- RabbitMQ
We will be using Kafka in our deployment.
To deploy Eventeum, you need these things:
Prerequisite
- Java8
- Maven
- Mongo
- Kafka
- Zookeeper
- Ethereum Node
- Docker (optional)
You can deploy Eventeum with or without docker. To get started I’ll recommend docker all-in-one installation. It comes with all the dependencies mentioned above, though you still need to install Java8 and Maven (so install these first). I have installed both versions, with and without docker, but will mention docker all-in-one installation only as it is easy and you don’t need a lot of setups.
Installing Eventeum using Docker
To install Eventeum using Docker, you must have Docker and Docker-compose in your system. After installing them, follow below instructions
- Checkout Eventeum Github Repo
$ git clone https://github.com/ConsenSys/eventeum.git
After checking out the code, navigate to the root directory
$ cd /path/to/eventeum/- Compile, test and package the project
$ mvn clean packageAll-in-one docker installation
$ cd server
$ docker-compose -f docker-compose.yml build
$ docker-compose -f docker-compose.yml up
Once installed you can see logs in docker terminal.
Note: You might need sudo depending on your docker installation.
Testing Eventeum
For this purpose, we will deploy a contract on our local parity node (already installed by Eventeum) and then will register an event subscription on Eventeum for Broadcasting via Kafka.
Deploy contract on Local Parity node
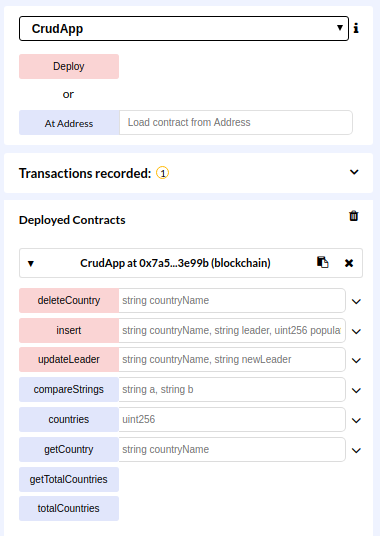
Let’s Deploy a contract we already made in our previous tutorial. To deploy CrudApp.sol contract we will use Remix IDE and Metamask.
- Open Remix and add CurdApp.sol contract
- Select proper compiler (0.4.23 in our case) and compile (Ignore warnings, if any 😃)
- On Metamask Select Localhost:8545
- In Remix, Go to Run Tab and select Web3 Provider in Environment and Deploy
That’s it you deployed the contract on your local Parity dev node.
Register Event
We need to now Register events, so Eventeum can listen to those events and broadcast them. Eventeum exposes rest APIs for this purpose, we will use them.
- Register events API-
- URL:
/api/rest/v1/event-filter - Method:
POST
{
  "id": "event-identifier",
  "contractAddress": "0x1fbBeeE6eC2B7B095fE3c5A572551b1e260Af4d2",
  "eventSpecification": {
    "eventName": "TestEvent",
    "indexedParameterDefinitions": [
      {
        "position": 0,
        "type": "UINT256"
      },
      {
        "position": 1,
        "type": "ADDRESS"
      }
    ],
    "nonIndexedParameterDefinitions": [
      {
        "position": 2,
        "type": "BYTES32"
      },
      {
        "position": 3,
        "type": "STRING"
      }
    ]
  },
  "correlationIdStrategy": {
    "type": "NON_INDEXED_PARAMETER",
    "parameterIndex": 0
  }
}
To make our life simple, we will simply do a curl call. As you can see below, we are using localhost:8060 (on which, Eventeum is running) and you need to add the address for your deployed smart contract from Remix. We are currently registering CountryEvent from our smart contract which gets emitted on insert transaction.
curl -X POST \
http://localhost:8060/api/rest/v1/event-filter \
-H 'Cache-Control: no-cache' \
-H 'Content-Type: application/json' \
-H 'Postman-Token: 616712a3-bf11-bbf5-b4ac-b82835779d51' \
-d '{
"id": "Country",
"contractAddress": "ENTER_YOUR_CONTRACT_ADDRESS_CHECK_IN_REMIX",
"eventSpecification": {
  "eventName": "CountryEvent",
  "nonIndexedParameterDefinitions": [
    {"position": 0, "type": "STRING"},
    {"position": 1, "type": "STRING"},
    {"position": 2, "type": "UINT256"}] }
}'
If registered successfully, you will get your ID (Country in our case) back as a response. Now Let’s do an insert transaction which will emit our CountryEvent. For this purpose, we’ll use Remix again, using remix, you can call your contract functions.
So Now, Let’s put these 3 things in insert function (“USA”, “Elizabeth Warren ”, 327946410), if everything went well, you will be able to see the transaction in Docker terminal.
Subscribing Eventeum events in NodeJs service
Now let’s subscribe Kafka events using a NodeJs service. This will help you to a clear picture about how you can use Eventeum with your application. For this follow these steps.
mkdir watcher
cd watcher
npm init
npm install
npm i kafka-node  (Kafka-nodejs client)
touch index.js
Now add below code in index.
var kafka = require('kafka-node')
const client = new kafka.KafkaClient({kafkaHost: 'localhost:9092'});
var kafka = require('kafka-node'),
    Consumer = kafka.Consumer,
    // client = new kafka.Client(),
    consumer = new Consumer(
        client,
        [
            { topic: 'contract-events', partition: 0 }
        ],
        {
            autoCommit: false
        }
    );
consumer.on('message', function (message) {
    console.log(message);
});
You can run this using
nodejs index.jsTo test this, again do an insert transaction using remix and you will able to see console output for the event.
As you can see we are using the topic as ‘contract-events’, this is already inbuilt in Eventeum, to check all the topics defined by Eventeum.
bin/kafka-topics.sh --list --zookeeper localhost:2181
As you are using docker installation you need to go inside the docker and run the above command, though you need to change the /bin/kafka-topics.sh with actual installation path in docker. Eventeum already create below topics
__consumer_offsets
block-events
contract-events
filter-events
filter-events-dlteventeum
filter-events-erreventeum
filter-eventsnull
Here block-events track new block generations.
You can see more details here about Eventeum and learn more about it.
How to Use Eventeum on TestNet or MainNet?
To use Eventeum with Testnet or Mainnet you need to change Ethereum node URL in docker-compose.yml.
As I am facing problem with Infura’s eth_newBlockFilter api used by Eventeum, you can use QuickNode for this purpose.
QuikNode provides fast Ethereum nodes, combined with Eventeum you can monitor smart contract events reliably.
Need help with your project or have questions? Contact us via this form, on Twitter @QuickNode, or ping us on Discord!
About QuickNode
QuickNode is building infrastructure to support the future of Web3. Since 2017, we’ve worked with hundreds of developers and companies, helping scale dApps and providing high-performance access to 16+ blockchains. Subscribe to our newsletter for more content like this and stay in the loop with what’s happening in Web3! 😃